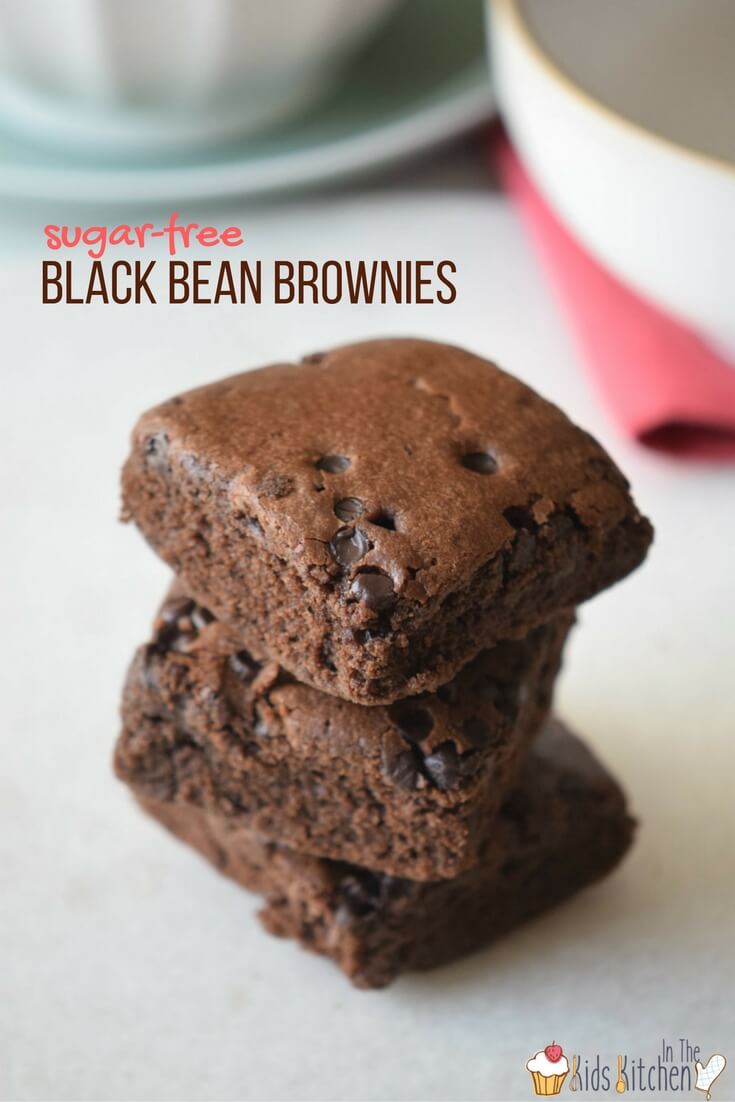
In the Kids' Kitchen

A resource for healthy food kids will love eating and making, along with menu plans for the busy mom, and kitchen tool and cookbook reviews. Welcome, to In the Kids' Kitchen.

  • Home
  • All Recipes
  • Baking with Kids
  • Holiday Fun
  • Healthy Family Food
  • Subscribe
  • Disclosure
Posts contain affiliate links for your convenience in recreating recipes/activities. Read our full disclosure policy here.
You are here: Home / Archives for chocolate

Valentine Teddy Bear Cupcakes

January 18, 2019 Leave a Comment

So cute and so much chocolate! These Valentine Teddy Bear Cupcakes are a sweet treat that will delight your little sweethearts!

So cute and so much chocolate! These Valentine Teddy Bear Cupcakes are a sweet treat that will delight your little sweethearts!

Teddy Bear Cupcakes

Teddy bears and Valentine’s Day go hand in hand. But then afterwards there’s not much you can do with them!

That’s why I love these adorable Teddy Bear Cupcakes – they’re delicious and don’t end up in the stuffed animal pile later!

To make our Teddy Bear Cupcakes, we started with a classic chocolate cupcake and layered it with luscious chocolate buttercream frosting.

Then we created teddy bear faces using our favorite chocolate and peanut butter candies. (Actually these teddy bear faces make a super cute treat all by themselves!)

We took the same idea for our Teddy Bear Oreos, and made them into oversized Teddy Bear Cupcakes! Except this time we used Reese’s Peanut Butter Cups for our teddy bears.

Because chocolate and peanut butter go together like teddy bears and Valentine’s Day!

Finally, we put it all together to make a towering teddy bear cupcake that’s just bursting with chocolate and peanut butter goodness!

Yes, our teddy bear cupcakes are little over the top, but that’s what makes them so much fun! Valentine’s Day is an occasion that is known for its sweet treats, and these Teddy Bear Cupcakes are guaranteed to get ooh’s and ahh’s!

So grab the kids, grab lots of chocolate and candy, and get creating! I promise you’ll have just as much fun making these teddy bear cupcakes as you will eating them afterwards!

— Stacey

So cute and so much chocolate! These Valentine Teddy Bear Cupcakes are a sweet treat that will delight your little sweethearts!

Kitchen Supplies Used

  • Non-slip mixing bowls
  • Electric mixer
  • Frosting decorating bags
  • Muffin tins
  • Valentine’s cupcake liners

Grocery List

  • Flour
  • Baking soda
  • Baking powder
  • Granulated sugar
  • Salt
  • Eggs
  • Whole milk
  • Vegetable oil
  • Vanilla extract
  • Unsalted sweet cream butter
  • Powdered sugar
  • Cocoa powder
  • Heavy whipping cream
  • Reese’s peanut butter cups
  • Whoppers
  • Ghirardelli chocolate melting wafers
  • White candy melts
  • Black candy melts
  • Candy hearts

The above is a quick guide of what we used to make this recipe. A free printable copy of our Valentine Teddy Bear Cupcakes recipe with full ingredient amounts is available at the bottom of the post.

Be sure to pin our Teddy Bear Cupcakes on Pinterest:

So cute and so much chocolate! These Valentine Teddy Bear Cupcakes are a sweet treat that will delight your little sweethearts!

Prep Tips:

  • When melting your chocolate, use caution, as it will become hot. You can pour the candy melts into microwave safe bowls to melt and then scoop into the decorating bags. You can also skip a step and melt directly in the bags (make sure the bags are microwave safe – this won’t work if you use regular ziplock bags).
  • Feel free to use your favorite cupcakes recipe for your teddy bear cupcakes or even a box mix to save time. If you want extra peanut butter flavor, try these Reese’s surprise cupcakes.
  • Likewise, you can also use your favorite frosting recipe or even store-bought frosting. Keep in mind that homemade buttercream frosting tends to hold it’s shape better than store-bought.


Free printable copy of our Teddy Bear Cupcakes recipe:

Yield: 12 cupcakes

Valentine Teddy Bear Cupcakes

So cute and so much chocolate! These Valentine Teddy Bear Cupcakes are a sweet treat that will delight your little sweethearts!

So cute and so much chocolate! These Valentine Teddy Bear Cupcakes are a sweet treat that will delight your little sweethearts!

Prep Time 30 minutes
Cook Time 25 minutes
Total Time 55 minutes

Ingredients

Cupcake Ingredients:

  • 2 cups sugar
  • 1 3/4 cups flour
  • 3/4 cup cocoa
  • 1 teaspoon baking powder
  • 1 teaspoon baking soda
  • 1 teaspoon salt
  • 2 eggs, room temp
  • 1 cup whole milk, room temp
  • 1/2 cup vegetable oil
  • 2 teaspoon vanilla
  • 1 cup boiling water

Chocolate Frosting Ingredients:

  • 1 cup unsalted sweet cream butter, softened
  • 3 cups + 1/2 cup powder sugar
  • 1/2 cup cocoa
  • 2 teaspoon vanilla
  • 3-5 Tablespoons heavy whipping cream

Peanut butter cup teddy bear:

  • Reese's peanut butter cups, unwrapped
  • Whoppers
  • Peanut butter or milk chocolate wafers, used for the ears and mouth
  • 1/2 bag of white candy melts
  • 1/2 bag of chocolate candy melts
  • Candy hearts

Instructions

!To make the cupcakes:

  1. Preheat oven to 350 degrees F.
  2. Prepare muffin tins with cupcake liners.
  3. Whisk the sugar, flour, cocoa, baking powder, baking soda and salt in a large mixing bowl.
  4. In a separate bowl, combine the eggs, milk, oil and vanilla extract.
  5. Using an electric mixer, add bowl of wet ingredients to the bowl of dry ingredients, beating on medium until the batter is smooth.
  6. Gradually add the boiling water, milk and oil and blend together until the batter is smooth.
  7. Using a medium scoop fill the paper lined cupcake tins with the prepared batter.
  8. Bake for 20-25 minutes, or until an inserted toothpick comes out clean.
  9. Allow to cool slightly before transferring to wire racks.

!Chocolate Frosting Directions:

  1. Beat together powdered sugar, butter and cocoa powder in a mixing bowl.
  2. Add the vanilla and chocolate until well incorporated.
  3. Add in the heavy whipping cream, and continue to mix until stiff peaks form.
  4. Scoop the frosting into a decorating bag with a star tip.
  5. Generously cover each cupcake with chocolate frosting. You'll want enough to place your Reese's cup bears into so that they are secure.

!Candy Teddy Bear Directions:

  1. Pour each color of candy melts into their own plastic decorating bag and cut the tip so there is a small opening.
  2. Take one peanut butter or chocolate wafer for each bear, then cut them in half. Use the black candy melt as glue, to affix the chocolate wafer halves to the top of your Reese's cups as "ears." Hold wafers in place until the chocolate sets.
  3. Draw a large dot of the melted chocolate candy onto the back of a whole peanut butter or chocolate wafer and the place in the middle of the Reese's cup. This will be the nose.
  4. Use your melted white chocolate to draw eyes on the bear's face. Allow to dry.
  5. Use the melted dark chocolate to draw a pupil on each eye.
  6. Carefully turn your Reese's cup bears sideways, and press the bottom into the chocolate frosting on top of your cupcake. Make sure the bear is securely in place before letting go.
  7. Add two Whoppers on either side of the Reese's cups to be your bear's arms.
  8. Finally, place a candy heart into the frosting between your Whoppers.
© Stacey Rodriguez
Cuisine: American / Category: Holiday Fun

More Valentine’s Day Cupcakes for Kids

Click here to see ALL of our favorite Valentine’s Day cupcake recipes!

A collection of the most gorgeous Valentine's Day Cupcakes from top food bloggers that taste as amazing as they look! Perfect for a romantic date or kids party!

Filed Under: Holiday Fun, Recipes Tagged With: chocolate, cupcakes, desserts, Valentine's Day

Strawberry Santa Hat Cupcakes

December 19, 2018 1 Comment

My daughter and I were out grocery shopping when she spotted them – chocolate cupcakes piled high with bright red frosting to resemble Santa Hats.

While I’m not anti-food dye, I still could not stomach the thought of that much red food dye working it’s way through either of our systems, so I decided to tempt her with a healthier alternative – Strawberry Santa Hat Cupcakes. 

These bright red strawberry cupcakes also make the perfect Valentine’s Day treat!

Gorgeous Strawberry cupcakes make a festive kids holiday treat! Perfect for Valentine's Day or Christmas!

Strawberry Santa Hat Cupcake Recipe

Okay, so “healthier” is a relative term when we’re talking cupcakes, but I still feel a lot better about serving my daughter and our daycare kids these delicious cupcakes versus those store-bought ones that were bound to dye their teeth bright red (and guarantee an all-day sugar high).

Sugar causes strawberries to macerate (let out their juices) so if at all possible, try to add the strawberries close to the time of serving. It’s not a big deal if you can’t, just expect a bit of strawberry juice on the frosting (which I personally didn’t mind).

We brought a batch of these into my daughter’s classroom for her Christmas party and they were a huge hit, and it was hilarious getting to watch the kids try to stretch their mouths out big enough to get the strawberry, frosting and cake all in one bite.

How to Make Strawberry Santa Hat Cupcakes, a delicious cupcake recipe kids can help make for Christmas

Strawberry Santa Hat Cupcakes Ingredients

  • 1 1/3 cups all-purpose flour
  • 1/4 teaspoon baking soda
  • 2 teaspoons baking powder
  • 3/4 cup unsweetened cocoa powder
  • 1/8 teaspoon salt
  • 3 tablespoons butter, softened
  • 1 1/2 cups white sugar
  • 2 eggs
  • 3/4 teaspoon vanilla extract

For the frosting:

  • 1 cup butter, softened
  • 3-4 cups icing sugar
  • 2 teaspoons vanilla extract
  • pinch salt
  • 2-3 tablespoons milk or heavy cream
  • Strawberries, hulled

Tip: letting the kids hull the strawberries is a great practical life and fine motor activity. Read Jennifer’s how-to here.


Kitchen Tools You May Find Helpful:

  • Cupcake pan
  • Reusable non-stick silicon cupcake liners 
  • Non-slip mixing bowls
  • Measuring cups and spoons
  • Stand mixer or hand mixer
  • Strawberry huller or knife
  • Cutting board
  • Wilton cupcake decorating kit


How to Make Strawberry Santa Hat Cupcakes

Preheat oven to 375 degrees F.

Line a muffin pan with themed cupcake liners.

Tip: Reusable silicon cupcake liners are a breeze to use (cupcakes pop right out!) but they save money and are less waste in the long run!

In a large bowl, sift together the flour, baking powder, baking soda, cocoa and salt. Set aside.

In a large bowl, cream together the butter and sugar until light and fluffy, about 2 minutes.

Add the eggs one at a time, beating well with each addition, then stir in the vanilla.

Add the flour mixture alternately with the milk; beat well. Fill the muffin cups 3/4 full.

Bake for 15 to 18 minutes, until a toothpick inserted into the cake comes out clean.

how-to-make-santa-hat-cupcakes-1

Place softened butter into a bowl and beat in 2 cups of icing sugar. Add 2 Tablespoons heavy cream and vanilla.

Add remaining icing sugar 1/2 cup at a time until you reach your desired consistency.

how-to-make-santa-hat-cupcakes-2

Spoon the frosting into a piping bag fitted with a 2D Wilton tip, or other preferred large piping tip.

Swirl the frosting onto the cooled cupcakes, starting in the center – moving outwards and then back in and up, being careful not to give the frosting too much height.

how-to-make-santa-hat-cupcakes-3

While the frosting is soft, press a hulled strawberry on top so that the cut edge is against the frosting.

Add a small dot of frosting to the tip of the strawberry and let set.

Repeat with remaining cupcakes.

Pin this Strawberry Santa Hat Cupcakes recipe:

Kids will love getting to help make these delicious Strawberry Santa Hat Cupcakes for Christmas, a healthier alternative to red food dye

Grab your free copy of our Santa Hat Cupcakes recipe here:


Yield: 12 cupcakes

Strawberry Santa Hat Cupcakes

Gorgeous Strawberry cupcakes make a festive kids holiday treat! Perfect for Valentine's Day or Christmas!
Prep Time 20 minutes
Cook Time 18 minutes
Total Time 38 minutes

Ingredients

Cupcake Ingredients

  • 1 1/3 cups all-purpose flour
  • 1/4 teaspoon baking soda
  • 2 teaspoons baking powder
  • 3/4 cup unsweetened cocoa powder
  • 1/8 teaspoon salt
  • 3 tablespoons butter, softened
  • 1 1/2 cups white sugar
  • 2 eggs
  • 3/4 teaspoon vanilla extract

Vanilla Buttercream

  • 1 cup butter, softened
  • 3-4 cups icing sugar
  • 2 teaspoons vanilla extract
  • pinch salt
  • 2-3 tablespoons milk or heavy cream

Additional Ingredients

  • Strawberries (can use red frosting instead), green trimmed

Instructions

For the Cupcakes:

  1. Preheat oven to 375 degrees F.
  2. Line a muffin pan with themed cupcake liners.
  3. In a large bowl, sift together the flour, baking powder, baking soda, cocoa and salt. Set aside.
  4. In a large bowl, cream together the butter and sugar until light and fluffy, about 2 minutes.
  5. Add the eggs one at a time, beating well with each addition, then stir in the vanilla.
  6. Add the flour mixture alternately with the milk; beat well. Fill the muffin cups 3/4 full.
  7. Bake for 15 to 18 minutes, until a toothpick inserted into the cake comes out clean.

For the frosting:

  1. Place softened butter into a bowl and beat in 2 cups of icing sugar. Add 2 Tablespoons heavy cream and vanilla.
  2. Add remaining icing sugar 1/2 cup at a time until you reach your desired consistency.

  3. Spoon the frosting into a piping bag fitted with a 2D Wilton tip, or other preferred large piping tip.
  4. Swirl the frosting onto the cooled cupcakes, starting in the center - moving outwards and then back in and up, being careful not to give the frosting too much height.
  5. While the frosting is soft, press a hulled strawberry on top so that the cut edge is against the frosting.
  6. Add a small dot of frosting to the tip of the strawberry and let set.
  7. Repeat with remaining cupcakes.
© Jennifer Tammy
Cuisine: American / Category: Baking with Kids
Easy Santa Hat Cupcakes that kids can help decorate! A festive holiday treat perfect for a Christmas party! Rich chocolate cake & luscious vanilla frosting.


Would your kids go crazy for these delicious Strawberry Santa Hat Cupcakes?

For more delicious ideas for holiday baking with kids, check out:

oreo-snowmen

mini-gingerbread-house-cakes-square-j

untitled-design-59


Filed Under: Baking with Kids, Holiday Fun, Recipes Tagged With: chocolate, cupcakes, holiday

Healthy Homemade Fudgsicles (with Video)

April 17, 2018 1 Comment

What’s Inside: Healthy homemade fudgsicles that won’t break your diet and you can feel good about serving the kids too! Only 3 ingredients!

Healthy homemade fudgsicles that won't break your diet and you can feel good about serving the kids too! High in protein, a good source of calcium, and only 3 ingredients!

Healthy Homemade Fudgsicles

Fudgsicles are synonymous with summer, but since they have quite a bit of sugar, they’re not something we eat every day.

However, it’s actually super easy to make your own “good for you” version of the classic fudgsicle recipe!

Why our healthy fudgesicles rock:

  • Greek yogurt provides protein and calcium
  • Maple syrup has a low glycemic index compared to other sweeteners

You don’t need anything fancy to make our healthy fudgsicles – just three simple, real-food ingredients. (You might already have them on hand at home!)

Greek yogurt is one of our favorite ways to add richness to a recipe, as well a goodies like protein and calcium. We also love maple syrup as a sweetener in our desserts when possible because it doesn’t cause the “sugar spike” like white sugar. It’s low glycemic and often used in paleo treats.

So whether you’re looking for a chocolate fix that won’t bust your diet, or a healthy treat that the kids will love (or both!) – you’ve come to the right place!

Related: Try our Dairy Free Avocado Fudgesicles too!

Healthy Fudgsicle Ingredients

Only 3 ingredients needed!

  • 2 cups greek yogurt
  • 1/4 cup cocoa powder
  • 1-2 Tablespoons maple syrup, to taste


A free printable copy of our healthy homemade fudgesicle recipe is available at the bottom of the post.

Kitchen Tools Use to Make this Recipe:

  • High powered blender
  • Popsicle molds

What's Inside: A healthy homemade fudgesicle recipe that won't break your diet and you can feel good about serving the kids too!

How to Make Homemade Fudge Popsicles

Keep reading for step-by-step instructions and prep tips; a free printable copy of this recipe available at the bottom of the post.

Place all ingredients in blender and puree until well combined and smooth.

Taste and adjust the sweetness to your personal preference (if you like sweeter fudgesicles, you may want to add a touch more maple syrup).

Divide the mixture amongst 6 popsicle molds and freeze for at least 4 hours, or overnight.

To remove from molds, run the bottom of the popsicle mold under warm water for a few seconds. This should loosen up the fudgesicles just enough that you can wiggle them right out!

Enjoy immediately.

easy homemade fudge pops

Save this recipe! Be sure to pin our healthy fudge pops on Pinterest:

Healthy homemade fudgsicles that won't break your diet and you can feel good about serving the kids too! High in protein, a good source of calcium, and only 3 ingredients!

Grab a free printable copy of our Healthy Homemade Fudgesicle Recipe:

Yield: 6 servings

Healthy Homemade Fudgsicles

Healthy homemade fudgsicles that won't break your diet and you can feel good about serving the kids too! High in protein, a good source of calcium, and only 3 ingredients!

Healthy homemade fudgsicles that won't break your diet and you can feel good about serving the kids too! High in protein, a good source of calcium, and only 3 ingredients!

Prep Time 10 minutes
Total Time 10 minutes

Ingredients

  • 2 cups greek yogurt
  • 1/4 cup cocoa powder
  • 1-2 Tablespoons maple syrup, to taste

Instructions

  1. Place all ingredients in blender and puree until well combined and smooth.
  2. Taste and adjust the sweetness to your personal preference (if you like sweeter fudgesicles, you may want to add a touch more maple syrup).
  3. Divide the mixture amongst 6 popsicle molds and freeze for at least 4 hours, or overnight.
  4. To remove from molds, run the bottom of the popsicle mold under warm water for a few seconds. This should loosen up the fudgesicles just enough that you can wiggle them right out!
  5. Enjoy immediately.
© Jennifer Tammy
Cuisine: American / Category: Healthy Food

More of our favorite healthy chocolate recipes:

Delicious, decadent, and GOOD for you! These Greek Yogurt Chocolate Muffins are protein-packed, high fiber, low sugar, and oh-so-fudgey!

Greek Yogurt Chocolate Muffins

Healthy Whipped Chocolate Fruit Dip

Filed Under: Healthy Food, Recipes Tagged With: chocolate, desserts, Video

Healthy Chocolate Fruit Dip

January 23, 2018 Leave a Comment

Make eating fruit a lot more fun with this healthy chocolate fruit dip! Only 4 simple real food ingredients needed.

This fluffy chocolate spread pairs perfectly with fruit as an after school snack. (It also makes a crowd-pleasing party dip).

Along with energy balls this is just one of those snacks I almost always have in my fridge! It’s tasty for kids but also makes the perfect late night snack for mom & dad – that you don’t have to feel guilty about eating.

Healthy Chocolate Fruit Dip

It’s no secret that I love chocolate!

From brownies to bite size protein balls and now this healthy dip is there anything better than chocolate?

That said, it’s always a nice twist when the chocolate in question is healthy.. and that’s exactly what this simple fruit dip is!

This healthy chocolate fruit dip is made with only four ingredients and takes less than five minutes to whip together. Win!

How to make healthy chocolate fruit dip - snack for kids

Thanks to the greek yogurt the dip is full of protein as well as healthy fats from the almond butter which means it pairs perfectly with some fruit. This dip not only tastes good but it will keep little tummies feeling full until dinnertime!

There’s also a definitely perk if you use raw cacao. As one of the purest forms of chocolate raw cacao is high in anti-oxidants but not loaded with sugar. But not to worry! Using some pure maple syrup you can sweeten the dip.

Whipped Chocolate Fruit Dip Ingredients

You only need 4 simple real food ingredients!

  • 3/4 cup plain greek yogurt
  • 2 Tablespoons smooth natural almond butter
  • 1/8 cup raw cacao
  • 2 Tablespoons pure maple syrup

Tip: We use raw cacao for the extra nutritional benefits, but if raw cacao is not readily accessible, feel free to substitute cocoa powder.

Free printable copy of this recipe available at bottom of post.

Kitchen Tools You May Find Helpful:

  • Non-slip mixing bowls
  • Wire whisk

How to Make Healthy Chocolate Fruit Dip

This healthy chocolate fruit dip couldn’t be easier to make!

Simply add all ingredients to a medium mixing bowl and whisk until well combined and fluffy.

Tip: Start slow, otherwise you’ll have cacao everywhere 😉

Be sure to pin our whipped chocolate spread on Pinterest to save the recipe for later!

Make eating fruit a lot more fun with this healthy chocolate fruit dip! Only 4 simple real food ingredients and ready in minutes - this fluffy chocolate spread pairs perfectly with fruit as an after school snack. It also makes a sweet party dip! #chocolate #healthyrecipes

Grab a free printable copy of our fluffy chocolate fruit dip recipe here:

Print
Yum
Healthy Whipped Chocolate Fruit Dip (Only 4 Ingredients!)

Ingredients

  • 3/4 cup plain greek yogurt
  • 2 Tablespoons smooth natural almond butter
  • 1/8 cup raw cacao
  • 2 Tablespoons pure maple syrup

Instructions

  1. Simply add all the ingredients to a medium bowl and whisk with a fork until completely combined and fluffy. (Start slow, otherwise you'll have cacao everywhere!)
Schema/Recipe SEO Data Markup by Yummly Rich Recipes
0.1
https://www.inthekidskitchen.com/healthy-chocolate-fruit-dip/

Make eating fruit fun with this whipped chocolate dip!

Your turn: What’s your favorite “sneaky” health food recipe? Share in the comments below.

More of our favorite healthy-ish chocolate recipes:

For more delicious yet healthy chocolate recipes, check out our Greek Yogurt Chocolate Muffins or our healthy-ish Peanut Butter hot chocolate recipe.

Filed Under: Healthy Food, Recipes Tagged With: chocolate, snacks

Creamy Healthy Chocolate Smoothie Bowl

January 6, 2017 Leave a Comment

Chocolate ice cream for breakfast? What kid would say no to that?! But this Chocolate Smoothie Bowl is a WIN for parents too!

Flavor-wise this “ice cream” bowl is rich chocolate, the ingredients in it give a fantastic nutritional boost to your kid’s day. Oh, and there’s no processed sugar or artificial sweeteners here!

This Chocolate Smoothie contains everything a child (and us adults too!) need in a meal:

  • Proteins, fats and complex carbohydrates keep tummies satisfied and provide lasting energy
  • Hemp hearts and flaxseeds are full of healthy fats and omega 3s (which reduce inflammation and boost brain development!)
  • Raw cacao gives a tasty chocolate flavor and is full of beneficial antioxidants
  • Figs contribute a hit of B vitamins and iron! (Plus, figs help give you the creamy ice cream texture we all love!)

In short, this smoothie not only tastes good but is a dose of good health in a bowl! You little ones will be asking for more and you’ll be only too happy to comply!

Blend up a bowl full and give it a try!

Chocolate ice cream for breakfast?! This Chocolate Smoothie Bowl tastes like dessert, but is healthy enough to eat anytime! Protein, antioxidants, B Vitamins, Omega 3s & more!

Chocolate Smoothie Bowl Ingredients

(Makes 2 cups)

  • 1 large banana, frozen
  • 1 dried figg
  • 6 ice cubes
  • 3 tbs raw cacao
  • 2 tbs hemp hearts
  • 1 tbs ground flaxseed
  • 3 tbs coconut milk
  • 1 tbs pure maple syrup
  • 1/2 cup almond milk
  • 1/2 tsp greens + or 1/4 tsp matcha, optional
  • 1 tbs shredded coconut for topping
  • 1/2 tbs cacao nibs for topping

In a blender combine all ingredients except the toppings. The mixture will be very thick so you may need to use a tamper to press everything down. Depending on how powerful your blender is, you may need to add a tablespoon of water to help it along.

When mixture is fully combined, use a spatula to divide into bowls and top with your favorite toppings! Can be eaten right away or frozen for 15 minutes to thicken.

Chocolate ice cream for breakfast?! This Chocolate Smoothie Bowl tastes like dessert, but is healthy enough to eat anytime! Protein, antioxidants, B Vitamins, Omega 3s & more!

TIP:  I like to add a nutritional boost to my smoothies hence the greens/matcha. This does change the flavor ever so slightly so add one more tablespoon of syrup to counter the taste. Or, leave it out and enjoy as is!

TIP: Frozen bananas help keep the texture creamy and thick. If using raw bananas place the mixture into the freezer for fifteen minutes to thicken.

Grab your free printable version of this Chocolate Smoothie Recipe here:

Print
Yum
Creamy Healthy Chocolate Smoothie Bowl

Ingredients

  • 1 large banana, frozen
  • 1 dried figg
  • 6 ice cubes
  • 3 tbs raw cacao
  • 2 tbs hemp hearts
  • 1 tbs ground flaxseed
  • 3 tbs coconut milk
  • 1 tbs pure maple syrup
  • 1/2 cup almond milk
  • 1/2 tsp greens + or 1/4 tsp matcha, optional
  • 1 tbs shredded coconut for topping
  • 1/2 tbs cacao nibs for topping

Instructions

  1. In a blender combine all ingredients except the toppings. The mixture will be very thick so you may need to use a tamper to press everything down. Depending on how powerful your blender is, you may need to add a tablespoon of water to help it along.
  2. When mixture is fully combined, use a spatula to divide into bowls and top with your favorite toppings! Can be eaten right away or frozen for 15 minutes to thicken.
Schema/Recipe SEO Data Markup by Yummly Rich Recipes
0.1
https://www.inthekidskitchen.com/healthy-chocolate-smoothie-bowl/

You might also like these healthy snacks for kids:

chewy-chocolate-protein-balls

Chewy Chocolate Protein Bites with Caramel Drizzle

Filed Under: Healthy Food, Recipes Tagged With: breakfast, chocolate, dessert

Healthy Black Bean Brownies (Sugar free, flourless) – With VIDEO!

December 23, 2016 11 Comments

You know what makes you feel like a rockstar mom?

Handing your kid a brownie for breakfast and watching their face light up with confused, but unfettered joy.

With this sugar-free black bean brownie recipe, you can be that rockstar mom… and not have to deal with a sugar high (and subsequent crash) at 9am.

Brownies healthy enough to eat for breakfast?? Sugar free, whole food Black Bean Brownies are out-of-this-world fudge-y and decadent, but good for you too!

I had tried a black bean brownie recipe before, and was pleasantly surprised at the results, but every recipe that I knew of still had refined sugar as a main ingredient (or relied on artificial sweeteners). No. Thank. You.

So, we set out to make a great-tasting, sugar-free black bean brownie recipe with whole foods (that wouldn’t taste like we made a sugar-free black bean brownie with whole foods).

This recipe needs a food processor to really break up the beans and incorporate the other ingredients. I cannot vouch for results that don’t use a food processor. But the nice thing about using the food processor is that kids can help since all you need to do is throw in the required ingredients and blitz it all up!

These brownies don’t taste like a super indulgent, super chocolatey brownie – in order to do that, you would need to add unhealthy ingredients – but it is tasty and my kids always gobble them up without pause.

Check out our quick video for how to make black bean brownies – and then don’t forget to scroll down to grab our free printable recipe:


How to make healthy black bean brownies with no processed sugar

Ingredients to Make Black Bean Brownies

  • 2 cups cooked black beans (or 1-14oz can)
  • 1/2 cup chopped Medjool dates
  • 2 eggs
  • 1/2 cup natural applesauce
  • 2 tsp pure vanilla extract, or scrapings from one pod
  • 1/2 cup cocoa powder
  • 1/2 tsp baking soda
  • 1/2 tsp good-quality salt
  • 1/2 cup chocolate chips, optional

Note: The addition of chocolate chips may add sugar, depending on the type used.

Kitchen Tools You May Find Helpful

  • Food processor (The Hamilton Beach “Big Mouth” is our workhorse)
  • Spatula
  • Measuring cups and spoons
  • 9×9 square brownie pan

These sugar free black bean brownies are crumbly, fudgy, and all of the good things that brownies should be.

How to Make Black Bean Brownies

Preheat your oven to 350F and line or grease a 9×9″ square pan.

Have your child put all of the ingredients ingredients into a food processor.

Cover your ears and blend!

black bean brownies in the kids kitchen

Scrape the batter into the prepared pan and smooth it down with a spatula.

Bake at 350 for 20-25 minutes until set and a toothpick inserted comes out with crumbs but no wetness.

black bean brownies in the kids kitchen

These sugar free black bean brownies are crumbly, fudgy, and all of the good things that brownies should be. We’ve made these twice now, and next time I’m going to be adding in some good-quality chocolate chips… to my half of the pan anyways.

Pin this No-Sugar Black Bean Brownie recipe for later:

These sugar free black bean brownies are crumbly, fudgy, and all of the good things that brownies should be - without the sugar!

Grab your free printable version of our no-sugar black bean brownie recipe here:

Yield: 9 servings

Healthy Black Bean Brownies (Sugar free, flourless) - With VIDEO!

Brownies healthy enough to eat for breakfast?? Sugar free, whole food Black Bean Brownies are out-of-this-world fudge-y and decadent, but good for you too!

Brownies healthy enough to eat for breakfast?? Sugar free, whole food Black Bean Brownies are out-of-this-world fudge-y and decadent, but good for you too!

Prep Time 10 minutes
Cook Time 25 minutes
Total Time 35 minutes

Ingredients

  • 2 cups cooked black beans (or 1-14oz can)
  • 1/2 cup chopped Medjool dates
  • 2 eggs
  • 1/2 cup natural applesauce
  • 2 tsp pure vanilla extract, or scrapings from one pod
  • 1/2 cup cocoa powder
  • 1/2 tsp baking soda
  • 1/2 tsp good-quality salt
  • 1/2 cup chocolate chips, optional

Instructions

  1. Preheat your oven to 350F and line or grease a 9x9" square pan.
  2. Have your child put all of the ingredients ingredients into a food processor.
  3. Cover your ears and blend!
  4. Scrape the batter into the prepared pan and smooth it down with a spatula.
  5. Bake at 350 for 20-25 minutes until set and a toothpick inserted comes out with crumbs but no wetness.
© Jennifer Tammy
Cuisine: American / Category: Healthy Food

sugar-free-brownie-recipe

Do you have a brownie lover in your house that would go crazy for breakfast brownies?

You might also like these healthy kids snacks:

chewy-chocolate-protein-balls

Chewy Chocolate Energy Bites

A nutritious (and delicious) alternative to greasy french fries, these Baked Avocado Fries are packed with vitamins and fiber. Plus they're easy to make!

Baked Avocado Fries


Filed Under: Baking with Kids, Healthy Food, Recipes Tagged With: brownies, chocolate, Video

Healthy-ish Peanut Butter Hot Chocolate

December 20, 2016 1 Comment

Peanut Butter Hot Chocolate…and it’s healthy?! Try this decadent, protein-packed winter treat and it will be your new favorite too!

Growing up, I loved peanut butter and my mom couldn’t stand the sight or smell of it. I’ve lucked out with my daughter because not only does she love peanut butter as much as me – she loves peanut butter and chocolate – arguably one of the best flavor combinations in the world!

We love to experiment in the kitchen, and this Peanut Butter Hot Chocolate recipe is one of our latest creations. I think we have a new classic on our hands!

peanut-butter-hot-chocolate-recipe

This peanut butter hot chocolate is rich and decadent — just the way hot chocolate should be. It’s also protein-packed and a good source of calcium, so you can feel good about enjoying this treat with your kids! (See more health benefits of peanut butter here).

I suggest using regular (sweetened) peanut butter or an unsweetened peanut butter. However, I would not recommend a roasted peanut butter as the taste might overpower the other ingredients in this recipe.

TIP: Try substituting almond butter or cashew butter for more flavor combinations!

Using a full-sized whisk under careful adult supervision, kids can help make this recipe from start to finish.

A few tricks for a successful kid-made Peanut Butter Hot Chocolate experience:

  • Avoid child-sized utensils at the stove because it causes their hand to get too close to the heat.
  • Tie back loose hair and clothing and exercise caution as they add the peanut butter to the hot chocolate so it doesn’t splash.

healthy-hot-chocolate-recipe

Ingredients to Make Peanut Butter Hot Chocolate

  • 2 Cups milk
  • ½ Cup cocoa powder
  • ½ Cup chocolate chips
  • 1 Tbsp peanut butter
  • Honey, to taste
  • Pinch cinnamon, optional
  • Small marshmallows, to garnish
  • Chocolate syrup, to drizzle

Tip: While we prepared our peanut butter hot chocolate on the stove, you could also make this by heating up a cup of milk in the microwave and stirring in the remaining ingredients.

Kitchen Tools You May Find Helpful for this Recipe:

  • Saucepan
  • Whisk
  • Measuring cups and spoons

peanut-butter-honey-hot-chocolate

How to Make Healthy Peanut Butter Hot Chocolate

In a saucepan over medium heat pour the milk and add the cocoa powder. Cook for 5 minutes.

how-to-make-healthy-hot-chocolate

In the microwave, melt the chocolate chips and incorporate to the chocolate milk.

how-to-make-healthy-hot-chocolate-1

Add the peanut butter to the saucepan and simmer for 3 minutes. Stir occasionally.

how-to-make-healthy-hot-chocolate-2

Sweeten to taste with honey. (Be sure to do this after adding the peanut butter as peanut butter can also increase the sweetness depending on the type you use.)

how-to-make-healthy-hot-chocolate-3

When ready to serve, fill the jars with the mixture and top with some marshmallows.

Drizzle chocolate syrup over them.

Serve and enjoy.


Pin this Peanut Butter Hot Chocolate recipe:

peanut-butter-hot-chocolate-recipe

Grab your free printable of our Peanut Butter Hot Chocolate recipe here:

Print
Yum
Healthy-ish Peanut Butter Hot Chocolate

Ingredients

  • 2 Cups milk
  • ½ Cup cocoa powder
  • ½ Cup chocolate chips
  • 1 Tbsp peanut butter
  • Honey, to taste
  • Pinch cinnamon, optional
  • Small marshmallows, to garnish
  • Chocolate syrup, to drizzle

Instructions

  1. In a saucepan over medium heat pour the milk and add the cocoa powder. Cook for 5 minutes.
  2. In the microwave, melt the chocolate chips and incorporate to the chocolate milk.
  3. Add the peanut butter to the saucepan and simmer for 3 minutes. Stir occasionally.
  4. Sweeten to taste with honey.
  5. When ready to serve, fill the jars with the mixture and top with some marshmallows.
  6. Drizzle chocolate syrup over them.
  7. Serve and enjoy.
Schema/Recipe SEO Data Markup by Yummly Rich Recipes
0.1
https://www.inthekidskitchen.com/healthy-peanut-butter-hot-chocolate/

peanut-butter-hot-chocolate

Do you have a peanut butter and chocolate fan in your house? Who would you make this peanut butter hot chocolate recipe for?

For more delicious chocolate recipes you can make with kids in the kitchen, check out:

Chocolate Cookie Pudding is TRIPLE the chocolatey goodness! Thick, creamy from-scratch chocolate pudding with crunchy cookies and chocolate shavings combine for the perfect homemade dessert recipe!

Creamy & Crunchy Chocolate Cookie Pudding

Ooey-Gooey melt-in-your-mouth S'mores Cookie Bars will be your new favorite treat! A perfect party dessert: easy to make & a chocolate-filled crowd pleaser!

S’mores Cookie Bars


Filed Under: Holiday Fun, Recipes Tagged With: chocolate, drinks

From-Scratch Chocolate Cookie Pudding

November 20, 2016 Leave a Comment

This Chocolate Cookie Pudding is a rich, creamy dessert that your family will love!

One of my favorite childhood memories is the chocolate pudding my mom used to make. I remember clearly the anticipation — peeking in the fridge throughout the afternoon to check on it — just waiting to dive in after dinner.

This recipe is just like that thick, creamy classic, but with the addition of crunchy cookies and chocolate shavings. That’s triple the chocolatey goodness!

Chocolate Cookie Pudding is TRIPLE the chocolatey goodness! Thick, creamy from-scratch chocolate pudding with crunchy cookies and chocolate shavings combine for the perfect homemade dessert recipe!

Love pudding? Try our easy Watermelon Pudding Cups too!

Chocolate Cookie Pudding Ingredients

  • ¼ cup cocoa powder
  • ½ cup chocolate shavings
  • ¼ cup crushed chocolate cookies
  • 2 cups milk
  • ¼ cup cornstarch

Kitchen tools you might find useful:

  • Silicon whisk
  • Classic dessert glasses
  • Medium sauce pot

Directions

Place the cocoa powder, chocolate shavings, and chocolate cookies in a medium sauce pot.

Chocolate Cookie Pudding is TRIPLE the chocolatey goodness! Thick, creamy from-scratch chocolate pudding with crunchy cookies and chocolate shavings.

Pour the milk and slowly incorporate the cornstarch. Stir regularly.

Chocolate Cookie Pudding is TRIPLE the chocolatey goodness! Thick, creamy from-scratch chocolate pudding with crunchy cookies and chocolate shavings.

Set the pot over medium heat and stir until the first bubble forms.

Remove from the heat and let it cool down for 20 minutes.

Chocolate Cookie Pudding is TRIPLE the chocolatey goodness! Thick, creamy from-scratch chocolate pudding with crunchy cookies and chocolate shavings.

Divide into rock glasses or parfait/sundae cups to serve. Refrigerate to set.

Garnish with crushed cookies. Serve and enjoy.

Chocolate Cookie Pudding is TRIPLE the chocolatey goodness! Thick, creamy from-scratch chocolate pudding with crunchy cookies and chocolate shavings.

You’ll also love this extra-indulgent variation:

Simply incorporate some caramel sauce into the batter before cooking for a new chocolate caramel treat!

Chocolate Cookie Pudding is TRIPLE the chocolatey goodness! Thick, creamy from-scratch chocolate pudding with crunchy cookies and chocolate shavings combine for the perfect homemade dessert recipe!

Grab your free printable version of this Chocolate Cookie Pudding recipe:

Print
Yum
From-Scratch Chocolate Cookie Pudding

Ingredients

  • ¼ Cup cocoa powder
  • ½ Cup chocolate shavings
  • ¼ Cup crushed chocolate cookies
  • 2 Cups milk
  • ¼ Cup cornstarch

Instructions

  1. Place the cocoa powder, chocolate shavings, and chocolate cookies in a pot.
  2. Pour the milk and slowly incorporate the cornstarch. Stir regularly.
  3. Set the pot over medium heat and stir until the first bubble forms.
  4. Remove from the heat and let it cool down for 20 minutes.
  5. Divide into rock glasses.
  6. Garnish with crushed cookies.
  7. Serve and enjoy.
Schema/Recipe SEO Data Markup by Yummly Rich Recipes
0.1
https://www.inthekidskitchen.com/chocolate-cookie-pudding/

You might also like these chocolate recipes:

Chocolate Caramel Apple Pie

Chocolate S’mores Cookie Bars

Layers of Fall flavors will delight your taste buds! The name says it all: Chocolate Caramel Apple Pie - easy dessert recipe perfect to bake with kids! Ooey-Gooey melt-in-your-mouth S'mores Cookie Bars will be your new favorite treat! A perfect party dessert: easy to make & a chocolate-filled crowd pleaser!

Filed Under: Recipes Tagged With: chocolate, dessert, pudding

Chocolate Caramel Waffles

October 9, 2016 1 Comment

I love indulging in delicious homemade brunch recipes on the weekends, and these Caramel Chocolate Waffles definitely fit the bill.

An indulgent brunch recipe for Caramel Chocolate Waffles with a soft, fluffy inside and crispy outside drizzled with chocolate and caramel. The perfect Sunday morning indulgence

These chocolate caramel waffles are an indulgent treat for a lazy weekend morning, or for a special breakfast.

A waffle maker is an essential piece of equipment to make homemade waffles – I know that there are molds out there that go in a frying pan or a microwave, but they don’t result in that same tender inside with a crispy outside that you just need in a great waffle.

A waffle maker will pay for itself quickly, and you can make double or triple batches and freeze the extras for a quick homemade toaster waffle on busy mornings. Just ensure that the model you get is easy to clean.

Serve with a side of fruit so you can counterbalance any chocolate-for-breakfast guilt.
caramel-waffle-recipe

Ingredients to Make Chocolate Caramel Waffles

You will need:

  • 3 Cups flour
  • ½ Cup cocoa powder
  • 2 Cups chocolate milk
  • ½ Cup caramel sauce
  • 2 Eggs
  • 2 Tbsps vegetable oil
  • 2 Tsps baking powder
  • ¼ Cup water
  • Pinch of salt
  • Chocolate syrup, to taste


Kitchen Tools You May Find Useful:

  • Belgian waffle maker
  • Non-slip mixing bowls
  • Wire whisk set (3 sizes)
  • Measuring cups
  • Measuring spoons

An amazing brunch recipe that comes together in minutes, these Caramel Chocolate Waffles are perfect for celebrating any occasion

How to Make Chocolate Caramel Waffles

Preheat the waffle iron and brush it with vegetable oil.

Blend the flour, cocoa powder, chocolate milk, half the caramel, eggs, baking powder, and salt.

Transfer the batter to the waffle iron.

Bake for 5 – 8 minutes.

Top with caramel and chocolate syrup drizzles.

Serve and enjoy.

If you are feeling extra indulgent, incorporate some hazelnut spread into the batter.


Pin this chocolate caramel waffle recipe for later:

A delicious brunch recipe to start your special day with a bit of indulgence - Caramel Chocolate Waffles that take less than five minutes to whip together

Print your free copy of our chocolate caramel waffles recipe:

Print
Yum
Chocolate Caramel Waffles

Ingredients

  • 3 Cups flour
  • ½ Cup cocoa powder
  • 2 Cups chocolate milk
  • ½ Cup caramel sauce
  • 2 Eggs
  • 2 Tbsps vegetable oil
  • 2 Tsps baking powder
  • ¼ Cup water
  • Pinch of salt
  • Chocolate syrup, to taste

Instructions

  1. Preheat the waffle iron and brush it with vegetable oil.
  2. Blend the flour, cocoa powder, chocolate milk, half the caramel, eggs, baking powder, and salt.
  3. Transfer the batter to the waffle iron.
  4. Bake for 5 – 8 minutes.
  5. Top with caramel and chocolate syrup drizzles.
  6. Serve and enjoy.
Schema/Recipe SEO Data Markup by Yummly Rich Recipes
0.1
https://www.inthekidskitchen.com/chocolate-caramel-waffles/

caramel-chocolate-waffles-1

Do you indulge occasionally for brunch? What’s your favourite indulgent brunch recipe?

Be sure to check out some of our other delicious breakfast recipes, like our Copycat Starbucks Pumpkin Loaf or Mini Egg Souffles that Kids Can make!

Spot-on copycat Starbucks pumpkin loaf recipe! Perfect fall flavored pound cake with a rich caramel glaze - your favorite holiday dessert at home any time!

easy-egg-muffin-breakfast


Filed Under: Recipes Tagged With: breakfast, chocolate, dessert, waffles

Connect with us!

  • Facebook
  • Instagram
  • Pinterest
  • Twitter

Hi there & welcome!

We're Stacey and Jennifer, and we're so glad you stopped by to visit! In the Kids Kitchen is our place to share inspiration to cook, play, and learn with your kids. From tips for teaching kitchen skills, to family-friendly recipes, kitchen crafts & sensory play, cookbook reviews, and more!

Theme by 17th Avenue · Powered by WordPress & Genesis